> ## Content Index
> Fetch the complete content index at: https://technotes.tewodros.dev/llms.txt
> Use this file to discover other available public pages before exploring further.
# MikroTik Hotspot with FreeRADIUS and a Remote Captive Portal
- URL: https://technotes.tewodros.dev/mikrotik-hotspot-freeradius-remote-captive-portal/
- Published: 2026-10-09T17:00:25.000Z
- Updated: 2026-10-09T17:00:25.000Z
- Description: Guest Wi-Fi where the router enforces access, FreeRADIUS decides who gets in, and the login page lives on your own web server.
- Author: Tewodros Asfaw
- Tags: MikroTik, FreeRADIUS, Networking
## Why split it three ways?
A MikroTik router can run a hotspot entirely by itself: local users, local login page, done. That works for one café. It stops working when you have ten sites, vouchers sold online, or a marketing team that wants to change the login page without touching a router.
Splitting the job gives you:
- **MikroTik (the NAS):** intercepts traffic, shows the portal, enforces speed limits and session time.
- **FreeRADIUS:** one user database for every site. It answers "yes or no" and sends back limits.
- **Remote portal:** a normal website (PHP, Node, anything) that you can brand, update and connect to payments or SMS without logging into a router.
## How a login works
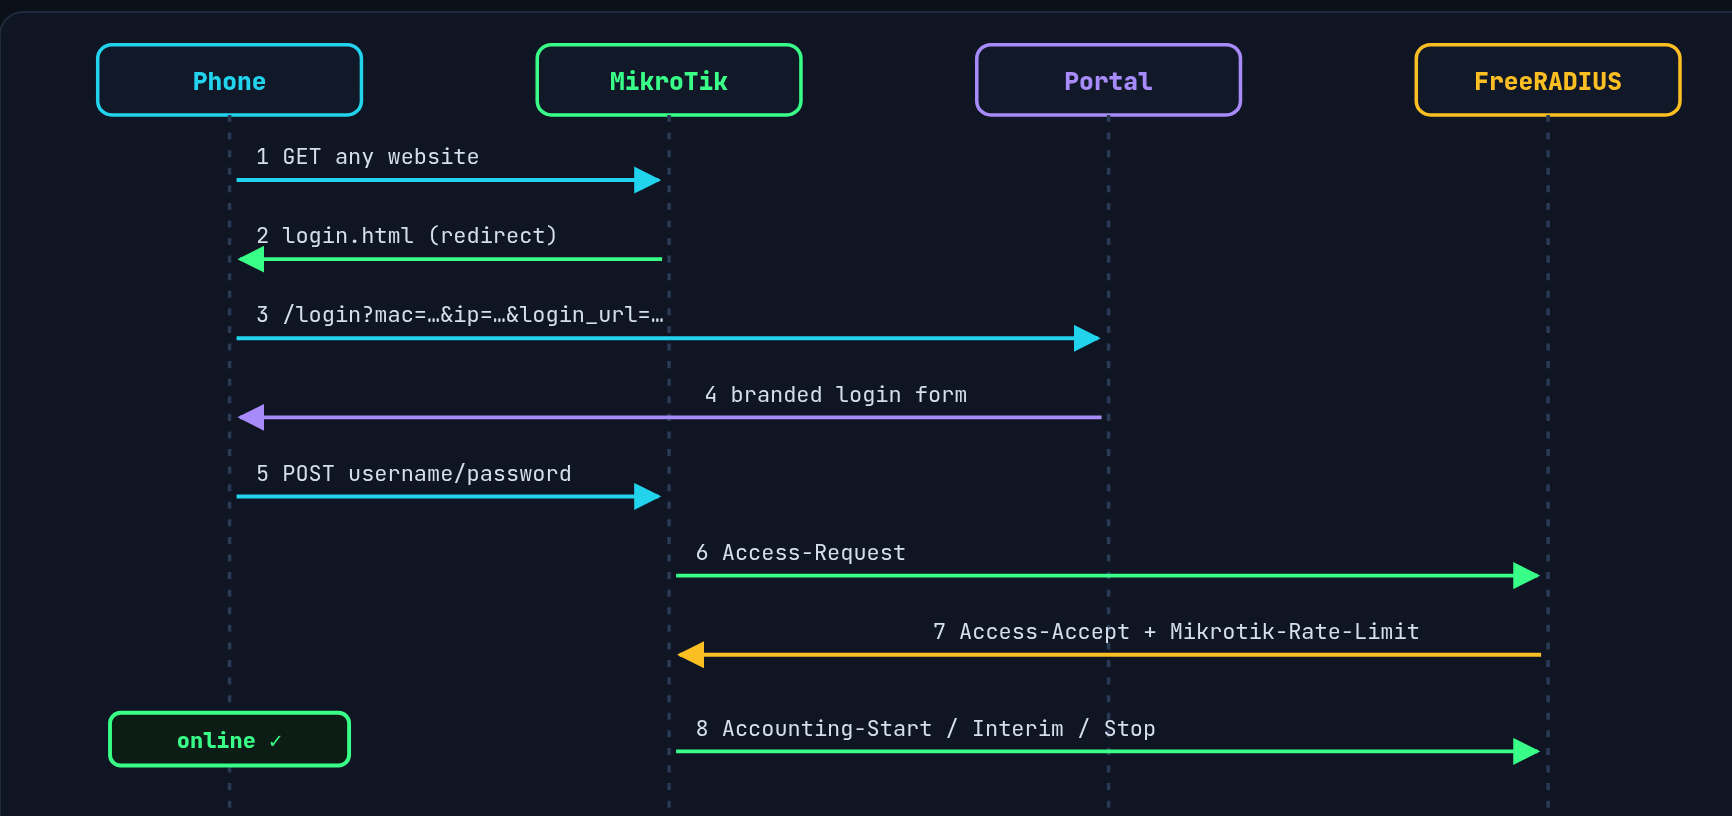
The portal never talks to RADIUS for the login itself. The router does.
1. A phone joins the Wi-Fi and opens any website.
2. The MikroTik hotspot catches the request and serves its own `login.html`.
3. Our custom `login.html` immediately forwards the browser to the remote portal, passing the client's MAC, IP and the router's login URL.
4. The user enters a voucher or username on the portal.
5. The portal form posts the credentials **back to the router's login URL**.
6. The router sends an Access-Request to FreeRADIUS.
7. FreeRADIUS replies Access-Accept with limits (speed, time, data), or Access-Reject.
8. The router opens access and starts sending accounting records.
The key point: the portal never talks to RADIUS directly for the login itself. The router does. The portal is only a page that collects credentials and hands them to the router.
## 1\. FreeRADIUS on Ubuntu
Install the server with MySQL/MariaDB support:
```bash
sudo apt update
sudo apt install freeradius freeradius-mysql freeradius-utils mariadb-server
```
Create the database and load the schema that ships with FreeRADIUS 3:
```bash
sudo mysql -e "CREATE DATABASE radius;"
sudo mysql -e "CREATE USER 'radius'@'localhost' IDENTIFIED BY 'ChangeThisDbPass';"
sudo mysql -e "GRANT ALL ON radius.* TO 'radius'@'localhost';"
sudo mysql radius < /etc/freeradius/3.0/mods-config/sql/main/mysql/schema.sql
```
Enable the SQL module:
```bash
sudo ln -s /etc/freeradius/3.0/mods-available/sql /etc/freeradius/3.0/mods-enabled/sql
```
In `/etc/freeradius/3.0/mods-enabled/sql`, set:
```
dialect = "mysql"
driver = "rlm_sql_${dialect}"
server = "localhost"
login = "radius"
password = "ChangeThisDbPass"
radius_db = "radius"
read_clients = yes
```
If you are not using TLS to a local database, comment out or remove the `tls { ... }` block inside the `mysql` section, or the module will fail to start.
### Tell FreeRADIUS about the router
Each router is a "client" (NAS). Add it in `/etc/freeradius/3.0/clients.conf`:
```
client site-01 {
ipaddr = 10.8.0.20
secret = LongRandomSharedSecret
shortname = site-01
}
```
The `ipaddr` must be the address the RADIUS packets actually arrive from. If the router reaches FreeRADIUS through a VPN, use its tunnel IP.
### Add a user with limits
FreeRADIUS already includes the MikroTik dictionary, so `Mikrotik-Rate-Limit` works out of the box.
```sql
INSERT INTO radcheck (username, attribute, op, value)
VALUES ('guest001', 'Cleartext-Password', ':=', 'Voucher123');
INSERT INTO radreply (username, attribute, op, value) VALUES
('guest001', 'Mikrotik-Rate-Limit', ':=', '2M/5M'),
('guest001', 'Session-Timeout', ':=', '3600');
```
- `2M/5M` is upload/download from the client's view: 2 Mbit/s up, 5 Mbit/s down.
- `Session-Timeout` is in seconds (one hour here).
For plans shared by many users, put the limits in `radgroupreply` and link users through `radusergroup` instead of repeating them per user.
### Test before touching the router
Run FreeRADIUS in debug mode in one terminal:
```bash
sudo systemctl stop freeradius
sudo freeradius -X
```
In another terminal:
```bash
radtest guest001 Voucher123 127.0.0.1 0 testing123
```
You want to see `Access-Accept` with the rate limit and timeout in the reply. Debug mode (`-X`) shows exactly why a request fails, so keep it open during the router setup too. When finished, stop it with Ctrl+C and run `sudo systemctl start freeradius`.
## 2\. MikroTik hotspot (RouterOS 7)
On RouterOS 7, first check that hotspot is allowed in `/system/device-mode`; on some newer devices it is off by default.
### Basic hotspot
Run the wizard on the guest interface or bridge:
```
/ip hotspot setup
```
Answer the prompts: interface, gateway address (for example `10.5.50.1/24`), pool, DNS servers, and a DNS name such as `wifi.example.com`. This creates the hotspot server, a profile (usually `hsprof1`), DHCP and NAT.
### Point the hotspot at FreeRADIUS
```
/radius add service=hotspot address=10.8.0.1 secret=LongRandomSharedSecret timeout=3s
/ip hotspot profile set [find name=hsprof1] \
use-radius=yes \
radius-accounting=yes \
radius-interim-update=5m \
login-by=http-pap,https
```
Allow FreeRADIUS to disconnect users or change their speed mid-session (CoA / Disconnect on UDP 3799):
```
/radius incoming set accept=yes port=3799
```
### Let unauthenticated users reach the portal
Before login, clients can only reach what the walled garden allows. Add the portal for both HTTP (proxied) and HTTPS (IP-level) traffic:
```
/ip hotspot walled-garden add dst-host=portal.example.com action=allow
/ip hotspot walled-garden ip add dst-host=portal.example.com action=accept
```
Add any other hosts the page loads from (fonts, CDN, payment gateway).
## 3\. Redirect the router's login page to the remote portal
The hotspot pages live in the router's file store, in the `hotspot` folder (or the folder named in the profile's `html-directory`). Replace `login.html` with a page that sends the browser to your portal and passes the values the portal needs:
```html
Redirecting to login...
```
Use the `-esc` versions of the variables. They URL-encode the values, so a URL inside a URL does not break the query string. `$(error-esc)` lets the portal show "wrong password" when a login fails and the router sends the user back.
Upload it with WinBox (Files), FTP or SFTP, overwriting the original. Keep a copy of the default first.
## 4\. The remote portal page
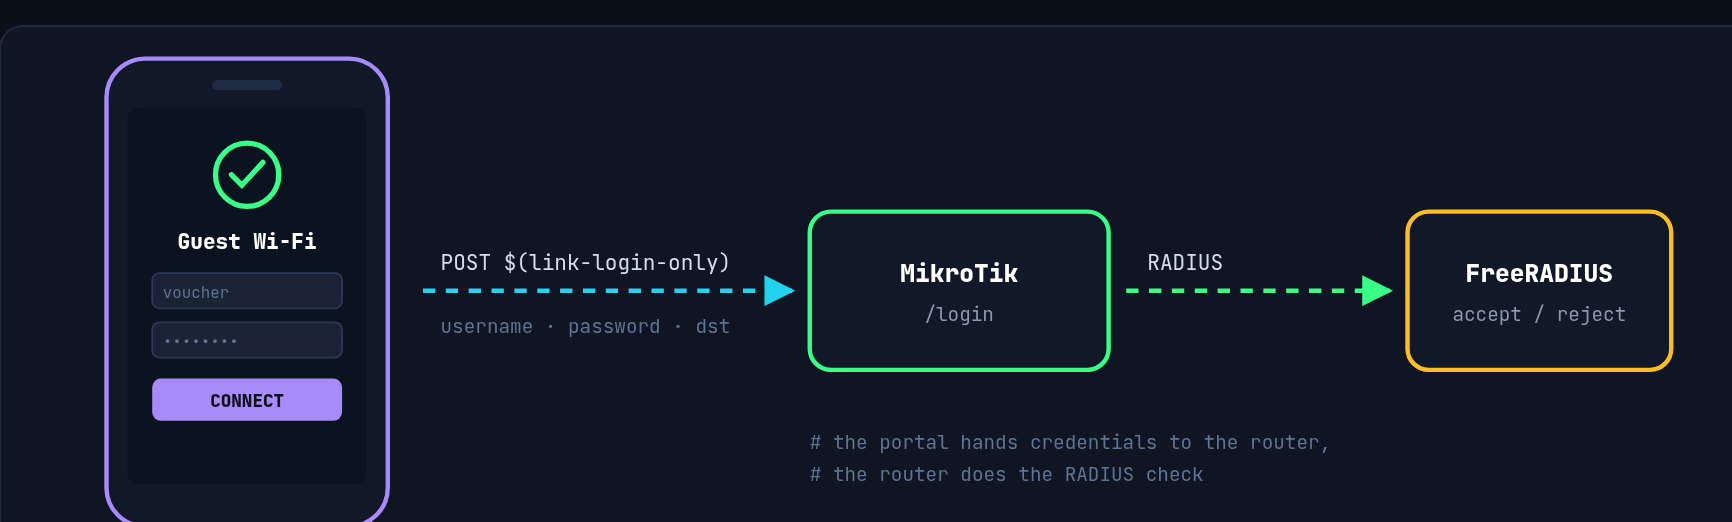
At login time, the portal only posts the form back to the router.
The portal reads the query string and builds a form that posts to the router. A minimal version:
```html
Guest Wi-Fi
Welcome
```
Notes:
- The router expects the fields `username`, `password` and optionally `dst` (where to send the user after login).
- The script only accepts the hotspot's own login URL. Without that check, anyone could craft a link that makes your portal post passwords to a server they control.
- `textContent` is used for the error message so the portal does not render HTML from the query string.
- Because the portal is your own web app, this is where you add voucher sales, SMS codes, terms acceptance or social login. Whatever method you use, the end result is the same: create or look up a user in the FreeRADIUS database, then post those credentials to the router.
## Security points that matter
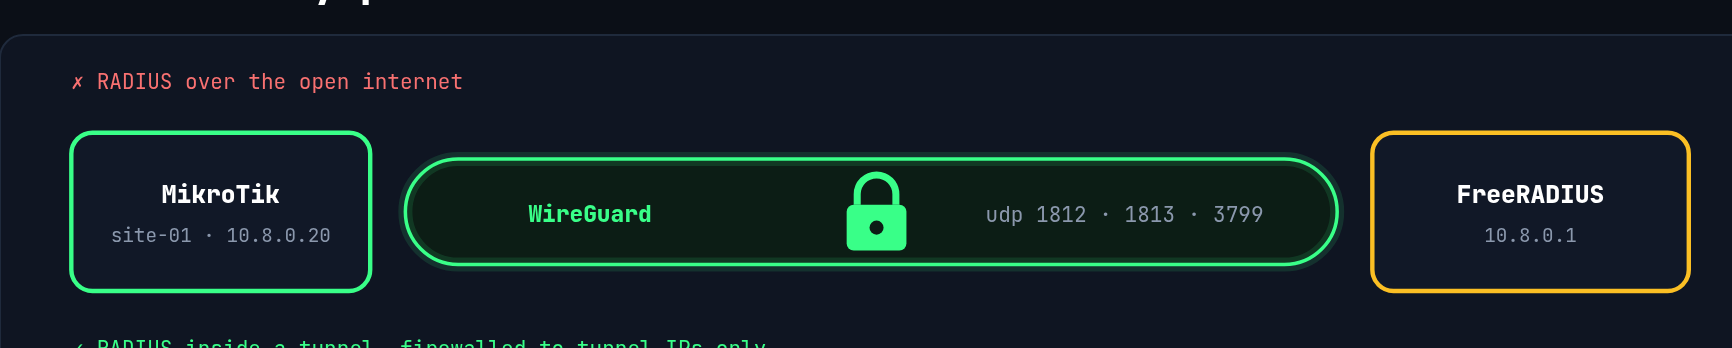
Keep RADIUS inside a VPN. Its MD5-based password hiding is weak by current standards.
**Encrypt the login post.** With `http-pap`, the password travels in plain text from the phone to the router. Also, an HTTPS portal posting to an HTTP router address triggers a "this form is not secure" warning in Chrome. The clean fix is to give the hotspot a real DNS name (`wifi.example.com`) with a valid certificate, enable `login-by=https`, and use `https://` in the login URL. The alternative is `http-chap`, where the portal hashes the password with the router's `$(chap-id)` and `$(chap-challenge)` values in JavaScript (the router ships `md5.js` for this), but that adds complexity and still uses MD5.
**Do not send RADIUS across the open internet.** RADIUS hides passwords with the shared secret and MD5, which is weak by current standards. Run it over a VPN such as WireGuard between each router and the RADIUS server, and firewall UDP 1812/1813 and 3799 to the tunnel only.
**Use long random shared secrets**, one per router, so one compromised site does not expose the others.
**Rate-limit the portal** and lock voucher codes after repeated failures, or someone will brute-force them.
**Keep accounting data under control.** `radacct` grows quickly with 5-minute interim updates. Archive or prune old rows on a schedule, and treat MAC addresses and login times as personal data under your local privacy law.
## Troubleshooting checklist
- **Portal does not load before login:** the host (or a CDN it uses) is missing from the walled garden. Check both `walled-garden` and `walled-garden ip`.
- **"RADIUS server is not responding":** check `/radius monitor 0`, the shared secret on both sides, and that `clients.conf` uses the IP FreeRADIUS actually sees. `freeradius -X` will say "unknown client" if the IP is wrong.
- **Access-Reject for a valid user:** in debug output, look for the password check. A mismatch between `http-chap` on the router and how the password is stored is a common cause.
- **Speed limit not applied:** confirm the reply attribute is spelled `Mikrotik-Rate-Limit` and appears in the Access-Accept in debug output.
- **Users loop back to the portal after login:** the `dst` value is empty or points back to the portal. Send them to a fixed welcome URL.
- **Phones do not show the login pop-up:** set a DNS name and valid certificate on the hotspot. RouterOS 7.3 and later then advertises the portal to clients through DHCP (RFC 7710).
## Summary
The router enforces, FreeRADIUS decides, and the portal collects. Keep those roles separate and you can add sites by adding a router and one `clients.conf` entry, change plans with a database update, and redesign the login page without touching any router.
*Sources: MikroTik RouterOS documentation, "HotSpot - Captive portal" and "Hotspot customisation" pages (help.mikrotik.com, checked 9 October 2026); FreeRADIUS 3.x default configuration layout on Ubuntu.*